Monday, June 3, 2013

Spelt Spinach Bread


http://schneiderchen.de | © 2013 | http://angiesrecipes.blogspot.com


http://schneiderchen.de | © 2013 | http://angiesrecipes.blogspot.com


A fiber-rich and earthy whole wheat spelt bread with creamed spinach baked right in. It is surprisingly delicious and doesn't taste much like spinach. This could be the way to finally get your picky husband or kids to eat their vegetables.

Enjoy this highly nutritious spelt bread spread with a nice generous layer of homemade seed butter or a bowl of bean soup for the lunch.


  • 300 g Frozen creamed spinach chunks
  • 180 ml Boiling water
  • 35 ml Olive oil
  • 340 g Organic wholemeal spelt flour
  • 200 g Bread flour
  • 11 g Sea salt
  • 10 g Dried yeast


  1. Place the frozen creamed spinach chunks in the mixer and pour in the boiling water. Process until blended.
  2. Whisk the spelt, bread flour and salt together in the bowl of a stand mixer. Make a well in the center. Add in dried yeast, olive oil and spinach mixture. Stir first on slow speed for 3 minutes, then increase the speed, knead the dough until the dough is smooth and elastic, about 6 minutes.
  3. Turn out the dough onto the lightly floured work surface and gently knead a few times. Grease the mixing bowl with a teaspoon of olive oil. Return the dough into the bowl and cover it with a damp towel. Let is rise for an hour, or until doubled.
  4. Once the dough has doubled, turn out the dough onto the lightly floured work surface and punch the dough with your fist so that it deflates. Knead the dough for a minute. Now shape the dough into a log and place it into a 30-cm loaf pan. Or divide the dough into 10 even pieces and shape them into round balls. Place them in a parchment-lined baking tray. Cover with a damp towel for 45-60 minutes.
  5. Preheat the oven to 200C/400F. Bake the bread loaf in the center of hot oven for about 40 minutes or 25 minutes if you make them into the small buns.


http://schneiderchen.de | © 2013 | http://angiesrecipes.blogspot.com


http://schneiderchen.de | © 2013 | http://angiesrecipes.blogspot.com


Thursday, May 30, 2013

Arabic Style Baked Chicken With Dried Plums and Herbs


http://schneiderchen.de | © 2013 | http://angiesrecipes.blogspot.com


The Arabic cuisine is mainly a combination of Mediterranean, Middle Eastern, and Indian food. It has been affected by the mingling of Arab and non-Arabs over the centuries.

Sumac is an essential ingredient and adds a tangy, lemony taste to the dishes. The dried plums are a popular cooking ingredient and impart a sweet and sour flavour. Serve the baked chicken breast with a side of couscous or steamed Basmati rice.


Arabic Style Baked Chicken With Dried Plums and Herbs

adapted from Eat Smarter


  • 400 g Chicken breast
  • Salt and freshly ground pepper
  • 1 tsp Paprika powder
  • 1 tsp Sumac powder
  • 250 g Onion
  • 3-5 Cherry tomatoes
  • 1/2 Organic lemon
  • 1/2 bunch Chives
  • 2 sprig Thyme
  • 1 bunch Parsley
  • 6 Dried plums
  • 2 tbsp Olive oil
  • 150 ml Chicken broth


  1. Rinse and dry the chicken breast. Season the chicken breast well with salt, pepper, sumac and paprika powder. Cover and place in the refrigerator to marinate for at least one hour.
  2. Peel, and cut the onion into wedges. Slice each tomato into 4 wedges. Rinse the lemon clean with hot water. Finely grate the lemon zest and squeeze the juice.
  3. Wash, dry the chives, thyme and parsley. Cut the chives into rings and finely chop the parsley and thyme leaves. Cut the dried plums into smaller pieces. Preheat the oven to 180C/350F.
  4. Heat the oil in a large skillet. Add in chicken breast and sear until golden on both sides.
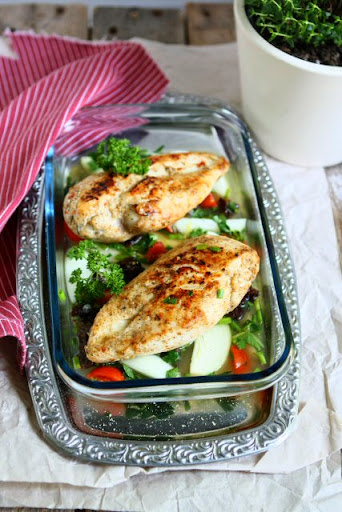
    In a baking dish, add in tomatoes, onions wedges, thyme, chives, half of the parsley, dried plums, lemon juice, zest and chicken broth. Place the pan-seared chicken breast fillets on top. Season with salt, pepper and paprika powder. Cover the baking dish with a piece of aluminum foil.
  5. Bake the chicken in the middle of the hot oven for about 40 minutes. Remove the aluminum foil after 30 minutes and continue to roast the chicken until done. Sprinkle the rest of parsley over and serve.


http://schneiderchen.de | © 2013 | http://angiesrecipes.blogspot.com


Wednesday, May 29, 2013

Lapis Legit Ny Liem


Kebetulan dapat telur yang merahnya kembar 2 dalam sebutir telur. Coba buat Lapis Legit dari Buku Resep Kue Ny. Liem. Bahannya sederhana dan semua ada di dapur.

Resep untuk 1 loyang
Bahan dan cara membuatnya :

Bahan 1
850 g (40 btr) kuning telur (saya pakai 20 butir telur kembar)
350 g gula pasir
1 sdt vanili cair

Bahan 2 (dikocok hingga mengembang)
400 g mentega
300 g margarin
4 sdm susu kental manis
1 sdt bumbu spekoek

Bahan 3 (campur dan ayak)
70 g terigu protein rendah (kunci)
20 g susu bubuk, sedikit garam.

Caranya :
1. Bhn 2 : kocok mentega dan margarin hingga putih dan mengembang, tambahkan susu kental manis, bumbu spekuk  kocok kembali hingga rata, sisihkan.
2. Kocok bhn 1 hingga kental dan mengembang, masukkan bhn 3 sambil diaduk dengan spatula hingga tercampur rata.
3. Tambahkan bhn 2 ke dlm adonan telur dan mentega sambil diaduk perlahan dgn spatulla hingga tercampur rata.
4. Alasi loyang uk 20x20x7 cm dg kertas roti. Tuang 3-4 sdm ke dlm loyang, ratakan. Panggang dgn api bawah suhu 150°C selama 10 menit hingga matang dan coklat. Angkat, matikan api bawah lalu nyalakan api atas.
5. Tekan tekan adonan dgn alat khusus, tuang kembali adonan, ratakan. Panggang dengan api atas 150°C  hingga matang. Lakukan langkah no 4 dan 5 hingga adonan habis.
6. Terakhir nyalakan api atas dan api bawah, panggang kembali 10 menit hingga benar-benar matang, jangan lupa tutup loyang dengan alumunium foil agar permukaan kue tidak hangus. Angkat, biarkan dingin.
Potong dan sajikan.
Telur Kembar (merahnya 2 di setiap butir telur)
Kocokan Mentega dan Merah Telur di Bowl Mixer
Adonan coklat dan adonan biasa.
Panggang kue 150°C, 7 sampai  10 menit setiap lapis

Tuesday, May 28, 2013

Rainbow Agar-agar Puding

Ingat waktu di Kuala Lumpur dulu suka beli agar-agar berlapis warna warni seperti ini ditoko kue. Warnanya sangat menarik dan rasa enak. Kali ini penasaran buat didapur sendiri. Ternyata perlu extra kesabaran saat melapisinya. Diperlukan waktu 1 jam untuk membuatnya. Rasanya enak, paduan manis dan gurih dari lapisan santannya dengan texture lembut membelai lidah.
Resep untuk 1 loyang


Bahan A
1 bks agar tanpa warna
130 gr Gula pasir
900 ml air
5 lbr daun pandan,
1/2 sdt garam

Bahan B
1 bks agar tanpa warna
130 gr Gula pasir
900 ml santan ( 400 ml santan kaleng + 500 ml air)
1 sdt garam
Bahan C
Pewarna sesuai selera. (saya pakai 5 warna : biru, hijau, kuning, orange dan merah)

Cara membuatnya :
Masak Bahan A dan B terpisah sampai mendidih
Untuk membuat lapisan warnanya :
Bagi adonan sesuai warna yang diinginkan. Untuk 5 warna, masing2 dibagi 180 ml (kurang dari segelas)
1. Masukan  adonan  bersantan dalam gelas secukupnya tambahkan warna, tuang kedalam loyang sampai agak mengeras.
2. Masukkan adonan  tanpa santan dalam gelas secukupnya tambahkan warna, tuang kedalam lapisan dalam loyang yg sudah agak mengeras tadi. Tunggu sebentar.
Ulangi langkah 1 dan 2 sampai adonan habis. Mulai dari yg bersantan dan tanpa santan, dengan warna yg sama. Sampai adonan habis.
Tunggu sampai adonan mengeras, dan masukkan ke kulkas.

Tips melapis adonan :
Agar-agar harus berada diatas api kecil, spy tetap cair  (tidak membeku) dan mudah dituang dan diwarnai. Aduk-aduk adonan agar tidak mengental.
Waktu melapis, lapisan dasar agar-agar  setengah keras, jangan terlalu cair atau jangan terlalu keras. Sentuh dgn tangan, kalau sudah tidak menempel ditangan bisa dilapisi.
Melapis dengan bantuan sendok sayur atau botol berspuit, dgn jarak sendok yg dekat dgn dasar lapisan agar tidak pecah (lapisan tercampur).

Pewarna Makanan dan gelas untuk melapis adonan
Didihkan adonan agar-agar bersantan dan tanpa santan terpisah.
Proses melapis puding
Agar-agar Pelangi siap dinikmati
Agar-agar 12 Lapis dengan 3 warna
Irisan Agar-agar 12 Lapis dengan 3 warna

Saturday, May 25, 2013

Black Olive Sesame Spelt Bread


http://schneiderchen.de | © 2013 | http://angiesrecipes.blogspot.com


http://schneiderchen.de | © 2013 | http://angiesrecipes.blogspot.com


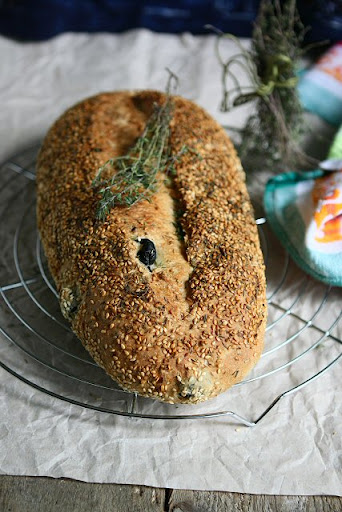
This is one of my favourite bread recipes from Dan Lepard, via Guardian. It is studded generously with black olives and coated with a mix of sesame seeds, oregano, thyme, sumac, and lemon zest. Since the spelt flour (I used bread spelt flour here) is more “water soluble” than wheat, therefore, using the same amount of liquid will result in a more sticky dough. Thus, if you plan to use wheat flour, then you need 250ml of liquid that the original recipe calls for, instead of 220ml that I used for this spelt version.


  • 330 g Black olives in brine
  • 1 tsp Instant dried yeast
  • 1 tsp Dark brown sugar
  • 50 g sesame seeds, plus an extra tablespoon to finish
  • 350 g Organic spelt bread flour, plus more for shaping
  • Olive oil, for kneading
  • 1 tbsp Dried oregano
  • 1 tbsp Dried thyme
  • 1 tbsp Sumac, optional but good
  • Finely grated zest of 1/2 lemon


  1. Strain the olives, then measure the liquid and top up with warm water to make 210ml. Put the strained olives and the liquid into a bowl, then stir in the yeast, sugar and 50g of sesame seeds. Add the spelt bread flour, mix to a soft, sticky dough, cover and leave for 10 minutes.
  2. Turn out the dough on a lightly oiled work surface, then give the dough a short, 10-second knead. Return the dough to the bowl, cover and leave for 10 minutes more. Repeat this quick knead twice more at 10-minute intervals, then leave the dough, covered, for 90 minutes.
  3. Meanwhile, line the base of a tray with nonstick baking paper, grind the herbs as fine as you can, then tip on to a large dinner plate and mix with a tablespoon of sesame seeds, the sumac (if using) and lemon zest. On another plate, have ready a wet square of kitchen towel.
  4. Pat the dough into a rectangle on a clean worktop dusted with a little flour, then roll it up tightly into a snug scroll, making sure all the olives are tucked in. Next, tightly roll the ends of the loaf, so they pinch in and the loaf has a shape a bit like a lemon. Roll the loaf on the wet towel, then roll it in the herb and spice mix.
  5. Place on the tray seam-side down, cover and leave to rise for 90 minutes. Slash the top and bake at 220C/425F for about 40 minutes until golden brown and crisp.


http://schneiderchen.de | © 2013 | http://angiesrecipes.blogspot.com


http://schneiderchen.de | © 2013 | http://angiesrecipes.blogspot.com


http://schneiderchen.de | © 2013 | http://angiesrecipes.blogspot.com


http://schneiderchen.de | © 2013 | http://angiesrecipes.blogspot.com


Tuesday, May 21, 2013

Vegan Gluten Free Fudge Brownies


http://schneiderchen.de | © 2013 | http://angiesrecipes.blogspot.com


These fudge brownies are gluten-free, vegan, rich yet truly healthy, free from all processed ingredients. A delicious combination of fudge brownie with nuts, honey and fruit. Delicious desserts are unnecessary fatty, sugary and calorie intensive.


Vegan Gluten Free Fudge Brownies

adapted from Fitsugar

CrustTopping

  • 200 g Dried dates, pitted
  • 120 g Walnuts, ground
  • 25 g Cocoa powder

  • 2 Ripe bananas
  • 40 g Cocoa powder
  • 120 g Peanut butter
  • 120 g Agave or maple syrup (I used honey)


  1. Mix together all crust ingredients in a food processor until well blended.
  2. Press it into a loaf pan lined with tin foil or plastic wrap until evenly distributed and set in the fridge while preparing the topping.
  3. Place all the ingredients for the topping in a food processor and process until well blended.
    Spread topping onto the crust layer base until evenly distributed. Place in the freezer for at least 30 minutes. Cut into 16 squares. Serve and refreeze the rest.


http://schneiderchen.de | © 2013 | http://angiesrecipes.blogspot.com


http://schneiderchen.de | © 2013 | http://angiesrecipes.blogspot.com


Sunday, May 19, 2013

Kue Ku Pandan dan Merah

Kue Ku, snack tradisional teman minum teh
Kali ini saya membuat 2 resep kue Ku.
Kue Ku warna hijau dengan warna alami dari juice daun pandan dan suji, sedangkan yang warna merah saya menggunakan beberapa tetes pewarna makanan berwarna merah.

Resep Kue Ku pandan
Untuk sekitar 34 Kue Ku ukuran sedang
Bahan :

450 gr Tepung Ketan
400 gr Kentang (saya pakai 125 gr tepung mash potato + 300 ml air panas )
80 gr gula pasir
1 kaleng santan (400 ml) pilih yg kental dan hangatkan.
100 ml air hangat (kurang lebih)
Pewarna kue sesuai selera
Untuk warna hijau saya pakai 10 lembar daun suji dan 5 lembar daun pandan, iris, blender + 50 ml air dan peras.

Bahan Isi :
200 gr kacang hijau kupas rendam dengan air hangat selama 2 jam
100 gr gula pasir
½ sdt garam
½ sdt Vanili
Daun pisang untuk alas kue (potong kecil ukuran alas kue sekitar 6 cm x 7 cm)
Cara Membuatnya :
Isi :
Kukus kacang hijau sampai matang dan empuk sekitar 20 menit, angkat dan haluskan bersama gula pasir, garam dan vanili. Bentuk bulat-bulat sebesar kelereng. Sisihkan.

Kulit Kue Ku :
Panaskan santan dengan gula pasir, aduk sampai gula larut, angkat.
Campur tepung ketan, kentang halus, santan hangat dan 100 ml air pandan, uleni  dengan tangan sampai menjadi adonan tidak lengket ditangan.
Ambil segenggam dan pipihkan adonan ditangan, isi dengan adonan isi, cetak dengan cetakan kue ku, lalu alasi dengan potongan daun pisang. 

Kukus selama 10 menit, jangan lupa selalu buka tutup cover panci steamer agar kue tidak melar. Setelah matang dinginkan kue pada suhu ruang agar kue tidak lengket.
Tip :
Olesi cetakan dengan minyak goreng.
Untuk Kue Ku yang merah saya pakai beberapa tetes pewarna makanan warna merah yang dilarutkan dalam 100 ml air hangat.
Lihat Langkah pembuatannya dibawah ini :

Bahan-bahan untuk 2 resep Kue Ku
Air perasan daun pandan dan suji
Adonan kue Ku siap di kukus selama 10 menit dengan api sedang
Kue Ku harum pandan siap disajikan
Kue Ku merah dalam panci saat dikukus selama 10 menit
Kue Ku merah matang siap disajikan