Wednesday, October 10, 2012

Dried Apple Sourdough Bread


http://schneiderchen.de | © 2011 | http://angiesrecipes.blogspot.com


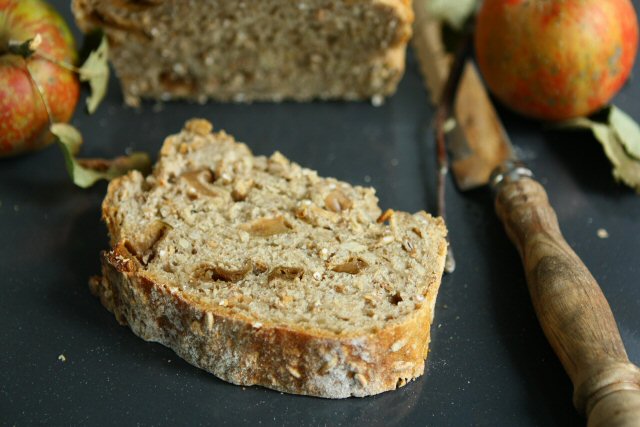
I found this recipe on daheim und unterwegs, and couldn’t resist the temptation to give it a try. With some aromatic homemade dried apples, crunchy peanuts and sunflower seeds, soaked rye berries, this sourdough bread has a hard crust, soft interior and makes a filling and wholesome lunch with a generous helping of salad. For the bread add-ins, don't limit yourself to just dried apples, peanuts and sunflower seeds. Great alternatives include dried figs, pecans, pumpkins, or dried beet. The original recipe calls for the combo of dried apples, carrots, celery root and hazelnuts.


Soaked RyeStarterFinal Dough

  • 200 g Rye berries
  • 4 g Salt
  • 200 ml Water, cold

  • 175 g Bread flour
  • 4 g Fresh yeast
  • 4 g Salt
  • 120 ml Water, at room temperature

  • 225 g Sourdough, 100% hydration
  • 404 g Soaked rye berries
  • 303 Starter
  • 200 g Wholewheat flour
  • 125 g Light rye flour
  • 180 g Bread flour
  • 15 g Fresh yeast
  • 12 g Salt
  • 310 ml Water, at room temperature
  • 200 g Dried apples, cut into smaller pieces
  • 200 g A mix of peanuts and sunflower seeds


  1. Place rye berries, salt, and cold water in a bowl. Set aside on counter overnight.
  2. Mix all the ingredients of starter in a bowl. Cover and set aside for an hour at room temperature. Refrigerate it for 15-24 hours before using.
  3. In the mixing bowl of your stand mixer, place in sourdough, soaked rye berries, starter, flours, fresh yeast, salt and water. Stir until a soft, pliable dough forms. Turn the dough onto a lightly floured work surface. Add in chopped dried apples, and a mix of peanuts and seeds. Knead until all ingredients are well-distributed .
  4. Dust the dough with a little flour and cover it with a clean kitchen towel. Allow it to proof for about 30 minutes. Divide the dough into 2 portions. Shape each into a log and place them into two parchment paper lined loaf pans. Dust lightly again with some flour. Cover and proof for an hour until the dough reaches 90% of the pan.
  5. Place a baking tray at the bottom of oven and preheat to 230C/450F. Place the bread into the hot oven and pour a cup of hot water into the baking tray. Close the door of the oven and bake for 10 minutes. Lower the oven temperature to 190C/375F and continue to bake for 40-50 minutes until nicely golden brown and crusty.


http://schneiderchen.de | © 2011 | http://angiesrecipes.blogspot.com


http://schneiderchen.de | © 2011 | http://angiesrecipes.blogspot.com


Monday, October 8, 2012

Bulgur with Butternut Squash and Cherries


http://schneiderchen.de | © 2011 | http://angiesrecipes.blogspot.com


http://schneiderchen.de | © 2011 | http://angiesrecipes.blogspot.com


Coarse bulgur, spiced butternut squash, bell pepper, dried cherries and cilantro team up in this fiber-rich, warm vegetarian main dish salad.


Bulgur with Butternut Squash and Cherries

adapted from Küchen Götter


  • 100 g Bulgur
  • Salt
  • 2 tbsp Dried cherries
  • 400 g Butternut squash
  • 1 Red bell pepper, peeled and diced
  • 1 Shallot, diced
  • 1 clove Garlic, chopped
  • 1 tsp Ginger, shredded

  • 1-2 tbsp Olive oil
  • 1/4 tsp Turmeric powder
  • 1/2 tsp Cumin powder
  • 1/4 tsp Chilli powder
  • 2 tbsp Orange juice
  • 80 ml Vegetable stock
  • 1 handful Cilantro


  1. Place bulgur and 250 ml water in a medium pot. Bring it to a boil. Season with salt. Turn the heat off and fold in dried cherries. Leave it, covered, for about 25 minutes until fluffy.
  2. Peel butternut squash. Scrape out the seeds and membrane. Cut into 1.5cm dices. Peel, deseed the red bell pepper. Cut into 2cm cubes. Peel and dice the shallot, garlic and ginger.
  3. Heat the olive oil in a pan. Add in diced shallot and garlic, stirring briefly, then add in diced butternut squash, bell pepper and ginger, and stir for a minute. Add in spices, stirring for one more minute, then pour in orange juice and vegetable stock. Cook, covered, for about 15 minutes. Stir from time to time. Remove cover and cook until remaining liquid evaporates. Fold the bulgur into the vegetables. Turn the heat off and mix in chopped cilantro leaves. Serve with yogurt sauce if desired.


http://schneiderchen.de | © 2011 | http://angiesrecipes.blogspot.com


http://schneiderchen.de | © 2011 | http://angiesrecipes.blogspot.com


Saturday, October 6, 2012

Cincau Hijau Asli di Noumea

Menetap di Noumea New Caledonia bukan berarti tidak bisa menikmati minuman segar Tradisional Cincau Hijau yang terkenal di tanah air, dan merupakan minuman sehat kaya serat dan obat Hypertensi. Pohon daun cincau (Cyclea Barbata Miers) tumbuh di Noumea, biasanya ditanam oleh orang keturunan Indonesia. Yuk lihat bagaimana cara membuat Cincau Hijau yang sederhana ini.

Minuman segar Cincau Hijau
Pohon Daun Cincau Hijau Merambat di Pagar
Pilih daun cincau yg gelap warnanya, atau yang sudah tua. Cuci bersih
Remas-remas daun sambil ditambah air suam-suam kuku
Sampai airnya hijau dan berbusa


Peras dan saring 

Ulangi meremas sampai daunnya terlihat transparant

Simpan air daun cincau di kulkas selama 1 jam agar menjadi Jelly. Siap disantap dengan santan dan gula

Seni Melipat Daun untuk Tumpeng

Nasi tumpeng yang indah dalam penyajian akan menambah selera makan.
Bagi teman-teman yang tidak berada ditanah air, kadang sulit untuk menemukan daun pisang disekitar tempat tinggal. Sebagai penggantinya bisa menggunakan plastik (terpal) warna hijau daun untuk membuatnya. Dibawah ini contoh-contoh cara melipat daun untuk tumpeng, dari Buku "Aneka Kreasi Tumpeng" tulisan Sufi SY dari Penerbit Gramedia.


Thursday, October 4, 2012

Roasted Pumpkin and Brussels Sprouts


http://schneiderchen.de | © 2011 | http://angiesrecipes.blogspot.com


http://schneiderchen.de | © 2011 | http://angiesrecipes.blogspot.com


http://schneiderchen.de | © 2011 | http://angiesrecipes.blogspot.com


A warm and cozy autumn side dish with roasted pumpkins and Brussels sprouts tossed with a spicy honey balsamic vinaigrette. The pomegranate seeds add their brilliant harvest colours to this rustic side dish.


  • 400 g Pumpkin, peeled and cut into inch pieces
  • 300 g Brussels sprouts, trimmed and cut into half
  • 2 Shallots, diced
  • 1 clove Garlic, chopped
  • 1 Red chilli pepper, cut into rings
  • 3 tbsp Olive oil
  • 1 tbsp Honey
  • 1 tbsp Balsamic vinegar
  • 1/2 tsp All spice
  • Salt and pepper
  • Pomegranate seeds

  1. Cut the pumpkin in half, scrape out the seeds and membrane , then cut into inch pieces. Slice off the rough part of the stem of Brussels sprouts. Remove the unappetizing outer leaves, cut out the core and slice vertically in half.
  2. Preheat the oven to 200C/400F. Remove papery outer skin from shallots and dice. Peel and chop the garlic. Cut the chilli pepper into rings. Combine olive oil, honey, balsamic vinegar, allspice and the prepared shallots, garlic, and chilli pepper. Season with salt and pepper.
  3. Place pumpkin and Brussels sprouts in a baking pan. Pour in the sauce and toss well. Place in the middle of hot oven and roast for about 25 minutes. Remove and sprinkle with some pomegranate seeds if desired.


http://schneiderchen.de | © 2011 | http://angiesrecipes.blogspot.com


Monday, October 1, 2012

Honey Lemon Roasted Hokkaido Wedges


http://schneiderchen.de | © 2011 | http://angiesrecipes.blogspot.com


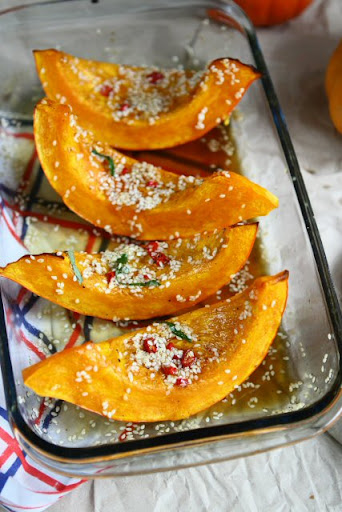
A savoury pumpkin side dish bursting with colour and flavour, perfect for autumn. Hokkaido pumpkins, also known as red kuri squash, originally from island Hokkaido, Japan, have a deep orange colour and are very sweet inside. You can use them in cooking, baking or simply enjoy them raw.


Honey Lemon Roasted Hokkaido Wedges

adapted from essen und trinken


  • 1 Hokkaido pumpkin
  • 1 Red chilli pepper
  • 3 tbsp Honey
  • 6 tbsp Lemon juice
  • 20 g Sesame seeds
  • Salt and pepper
  • 3 tbsp Olive oil
  • Nutmeg


  1. Cut the pumpkin from the top in half. Using a large spoon, scrape out the seeds and membrane , then cut into wedges. Preheat the oven to 200C/400F.
  2. Clean the chilli pepper by cutting off the stalk and removing the seeds, then cut into rings. Combine honey, lemon juice, sesame seeds, olive oil and chilli rings. Season with salt and pepper.
  3. Place pumpkin wedges in one large baking pan. Sprinkle the pumpkin wedges with a little of salt, pepper and nutmeg, then pour the honey-lemon mixture over. Bake in the hot oven for about 35 minutes.


http://schneiderchen.de | © 2011 | http://angiesrecipes.blogspot.com


http://schneiderchen.de | © 2011 | http://angiesrecipes.blogspot.com


Friday, September 28, 2012

Walnut stuffed Dates with Coconut


http://schneiderchen.de | © 2011 | http://angiesrecipes.blogspot.com


http://schneiderchen.de | © 2011 | http://angiesrecipes.blogspot.com


A quick and easy recipe for dates stuffed with a mixture of toasted walnuts and sesame seeds flavoured with cinnamon, orange zest and rose water. For the coating, I have used coconut flakes and pumpkin seeds, but any other nuts or seeds would work just fine here. They are great as a light dessert, a snack, or just anytime you feel like a nibble.


  • 70 g Walnuts, toasted
  • 30 g Sesame seeds, toasted
  • 1/2 tsp Cinnamon powder
  • 20 g Brown sugar
  • 1/2 tsp Orange zest
  • 1-2 tsp Rose water
  • 10 g Coconut oil, melted
  • 30 Lightly dried dates, pitted
  • 30 g Coconut flakes
  • 40 g Pumpkin seeds, finely chopped


  1. Toast walnuts, and sesame seeds in a dry skillet until fragrant, about 5 minutes, and then remove them from the heat and set aside to cool.
  2. Place walnuts, sesame, cinnamon, sugar and orange zest in a coffee grinder. Process until you have a thick paste. Turn the paste into a bowl and stir in rose water.
  3. Fill each date with about a teaspoon of nut mixture. Brush with melted coconut oil and coat with coconut flakes or chopped pumpkin seeds.


http://schneiderchen.de | © 2011 | http://angiesrecipes.blogspot.com


http://schneiderchen.de | © 2011 | http://angiesrecipes.blogspot.com