Wednesday, November 28, 2012

Talam Pumpkin

Kue Talam Pumpkin (Talam Labu Parang) ini enak sekali, lembut  manis dan gurih. Terasa sekali labu parangnya. Kue lebih enak dimakan setelah didinginkan semalam dikulkas, texturenya jadi lebih padat.

Resep dibawah ini untuk 21 cups (ukuran kue mangkuk)

Bahan Lapisan bawah :

500 gr  pure labu parang (pumpkin pure)
75 ml santan kental
70 gr tepung terigu
½  sdt garam
3 sdm gula pasir

Bahan Lapisan atas :

350 ml santan kental
40 gr tepung terigu
50 gr gula pasir
½  sdt garam

Cara Membuatnya :
Panaskan steamer, masukkan mangkuk untuk wadah talam, kukus sebentar agar kue tidak lengket.

Lapisan bawah : Aduk pure pumpkin dengan santan, tepung terigu, garam dan gula pasir sampai rata dan halus.
Masukkan 1,5 sendok makan adonan kedalam mangkuk sampai 3/4 tinggi mangkuk, lanjutkan sampai adonan habis.
Kukus selama 15 menit.

Lapisan atas : Campur semua bahan lapisan atas, aduk rata dan saring.
Tuang Adonan lapisan atas kedalam mangkuk talam pumpkin, lanjutkan mengukus selama 15 menit. Hingga kue masak.
Snack tradisional enak sebagai teman minum teh
Simpan di kulkas  selama 2 jam sampai talam set dan bisa dikeluarkan dari mangkuk. Hidangkan sebagai teman minum teh.
Dibawah ini gambar langkah-langkah pembuatan Talam Pumpkin.
Aduk rata adonan bagian bawah, masukan sebanyak 3/4 tinggi mangkuk
Aduk rata adonan bagian atas.
Saring adonan bagian atas  
Simpan di kulkas selama 2 jam agar talam set dan bisa dikeluarkan dari mangkuk

Pumpkin Pure

Musim gugur biasanya ditandai dengan panen labu parang (pumpkin). Pasar dan supermarket dibajiri berbagai jenis pumpkin dengan harga cukup murah. Beberapa event juga menggunakan pumpkin sebagai hidangan utamanya. Misalnya : Halloween dan Thanksgiving. Inilah saatnya membuat sendiri pumpkin pure yang lebih sehat.
Pilih Sugar Pumpkin yang rasanya manis dan warna isinya orange. Kulitnya berwarna agak kecoklatan.
Orang Perancis menyebutnya : Citrouille
Pumpkin mentah seberat 3,2 kg ini menghasilkan pure sebanyak 2,4 kg
Lihat langkah-langkah dibawah ini untuk cara mudah membuat pumpkin pure.
Panaskan Oven 170°C, cuci dan belah dua pumpkin.
Belah dua pumpkin dengan pisau, buang biji dan seratnya
Simpan di loyang dengan dilapisi kertas baking dan cover dengan kertas baking
Panggang dalam oven 170°C selama 45 menit
Pumpkin setelah di panggang, kulitnya lembut.

Isi pumpkin sudah matang dan lembut

Pindahkan isi pumpkin dengan sedok

Pure pumpkin siap di blender.

Wholewheat Bread with Walnuts


http://schneiderchen.de | © 2011 | http://angiesrecipes.blogspot.com


A wholesome, hearty, nutty wholewheat bread that goes wonderfully with a cold meat platter, fruit or cheese plate. Perfect toasted for a nutritious and healthy breakfast too.


Wholewheat Bread with Walnuts

- adapted from Brote für Genießer


  • 200 g Wholewheat flour
  • 80 ml Lukewarm water
  • 20 g Fresh yeast
  • 1 tbsp Sugar
  • 1 Apple, peeled, cored and grated
  • 150 g Sourdough starter, 100% hydration
  • 100 g Whole grain spelt flour
  • 350 g Dark bread flour

  • 10 g Salt
  • 4 tbsp Walnut oil
  • 205 ml Lukewarm water
  • 50 g Honey
  • 20 g Millet
  • 20 g Sesame seeds
  • 20 g Flaxseeds
  • 100 g Walnuts, chopped


  1. In a mixing bowl, add in wholewheat flour and make a well in the center. Crumble the fresh yeast into the well and add in 80 ml water and sugar. Stir together and leave it for 15 minutes.
  2. Peel, core and grate the apple. Add in sourdough starter, grated apple, flours, salt, walnut oil, water, honey, millet, sesame seeds, flaxseeds and chopped walnuts. Stir everything together on low speed until incorporated, then increase the speed and stir until a smooth and soft dough forms. Cover and set aside to proof for an hour.
  3. Gently knead the dough and divide into two portions. Shape one portion into a round and another into a log. Place the round dough, seam side up, into a well-floured proofing basket and another one into a parchment paper lined loaf pan. Dust the surface with flour and cover with a clean towel. Set aside to proof for a further 60 minutes.
  4. Preheat the oven to 220C/430F. Turn the boule out onto a wooden peel dusted with cornmeal. Sprinkle some flour over dough and cut some decorative slashes on the top of bread. Make a long slash lengthwise down the center of top of the loaf in the loaf pan. Bake for about 45 minutes until nicely golden brown.


http://schneiderchen.de | © 2011 | http://angiesrecipes.blogspot.com


http://schneiderchen.de | © 2011 | http://angiesrecipes.blogspot.com


Friday, November 23, 2012

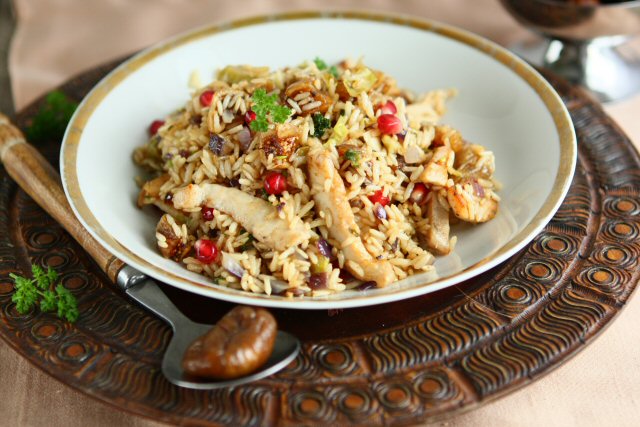
Brown Rice Pilaf with Dried Figs and Pomegranate


http://schneiderchen.de | © 2011 | http://angiesrecipes.blogspot.com


http://schneiderchen.de | © 2011 | http://angiesrecipes.blogspot.com


A pilaf or pilau is a Middle Eastern rice dish that is cooked in broth and spices. It may contain a variety of vegetables and meat. This is a delicious recipe for using up leftover roasted chicken or turkey, and works well with seafood too.


  • 1 tbsp Butter
  • 1 Shallot, diced
  • 1/3 tsp Allspice, ground
  • 1 clove Garlic, crushed
  • 180 g Long-grain brown rice
  • Sea salt and freshly ground pepper
  • 550-600 ml Vegetable broth or water, warmed
  • 100 g Dried figs, diced
  • 200 g Leftover roasted chicken breast
  • Some leftover roasted Brussels sprouts, cut into wedges
  • 1 tbsp Chopped parsley
  • 1 handful Pomegranate seeds


  1. Melt the butter in a saucepan over medium heat. Add the shallot and saute until tender. Add in allspice and crushed garlic and stir briefly.
  2. Add in brown rice and stir until the rice is coated with the butter. Pour in vegetable broth. Bring to the boil then immediately turn down to a simmer. Cover and cook for 30 minutes.
    Turn off the heat. Add in dried figs and let sit, covered, for 10 minutes.
  3. Season with salt and pepper and gently fork through the roasted chicken, Brussels sprouts and chopped parsley. Shower with pomegranate seeds at the last minute.


http://schneiderchen.de | © 2011 | http://angiesrecipes.blogspot.com


http://schneiderchen.de | © 2011 | http://angiesrecipes.blogspot.com


http://schneiderchen.de | © 2011 | http://angiesrecipes.blogspot.com


Thursday, November 22, 2012

Red Velvet Klasik Cup Cake


Red Velvet Cupcake siap disajikan
Resep Red Velvet klasik untuk cup cake  ini sehat, mudah, cepat membuatnya, dan semua bahannya tersedia di dapur. Rasanya lembut membelai lidah. Pas untuk minum minum teh atau kopi. Hari ini saya buat untuk berbuka puasa bulan Muharam.
Resep aslinya disini.
Sy membuat sedikit perubahan dalam resepnya sehingga menjadi lebih sehat dan sederhana.

Untuk 20 Cupcake ukuran kecil
Bahan :

125 gr mentega
1 1/4 cup gula pasir
2 butir telur
2 sendok makan perasan buah mixberries (sebagai pengganti pewarna merah)
1 cup buttermilk (saya buat sendiri dari 1 cup susu cair + 1 sendok makan cuka, tunggu 5 menit)
2 Cup Tepung Terigu Self rising
1/4 cup coklat bubuk
1 sendok teh garam

Cara Membuatnya :
Panaskan Oven 170°C. Siapkan Muffin Pan kecil dan 20 lembar kertas cupcake.
Mixer mentega dan gula pasir sampai halus dan berwarna pucat, tambahkan telur, buttermilk, perasan mixberries.
Campurkan Terigu, garam dan coklat bubuk aduk rata.
Campur adonan basah kedalam adonan kering, aduk dengan spatula sampai rata.
Masukan adonan dengan sendok icecream kedalam loyang muffin yang telah dialas kertas cupcake.
Panggang selama 20 menit. Angkat, sajikan.
Mixberries untuk pewarna merah Red Velvet
Perasan Mixberries disaring
Campur kedalam adonan basah
Adonan Red Velvet
Red Velvet siap dipanggang selama 20 menit
Red Velvet Cupcake hot and fresh from the oven

Monday, November 19, 2012

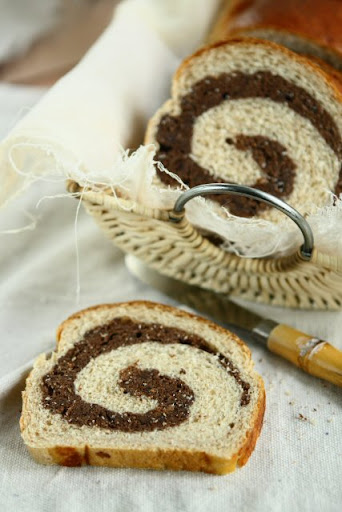
Two Tone Chocolate Yeast Loaf


http://schneiderchen.de | © 2011 | http://angiesrecipes.blogspot.com


A soft,tender, lightly sweetened two-toned yeast chocolate bread swirled with a layer of orange chiffon cake. Not only is it DELICIOUS, it looks quite pretty when you serve it. They are excellent when toasted and spread with butter or jam for a satisfying breakfast or afternoon snack.

Alternatively, you can replace the cocoa powder with milk powder (or just flour) to prepare a sweet bread dough, then topped with a disc of chocolate flavoured foam cake.


In October, I was the very LUCKY winner of $40 Amazon gift card from Choc Chip Uru - Go Bake Yourself. Uru is a 17-year-old culinary genius and a serious chocolate fan. Please head over to her space and learn more her baking, her fun undercover stories. The cookie stamp and cupcake decorating set I have bought with the gift card have finally arrived this Saturday. Thank you once again, Uru!


http://schneiderchen.de | © 2011 | http://angiesrecipes.blogspot.com


  • 200 g Refined spelt flour
  • 160 All purpose flour
  • 40 g Dutch-Processed cocoa powder
  • 7 g Salt
  • 90 g Brown sugar
  • 8 g Instant dried yeast
  • 190 ml Milk, lukewarm
  • 50 g Butter, cut into pieces
  • 1 Large egg, lightly beaten
  • 1 tsp Vanilla extract
  • 1 disc 10-inch Chiffon cake


  1. In a large mixing bowl, combine spelt flour, bread flour, cocoa, salt, brown sugar and the instant dried yeast. Blend well.
  2. Warm the milk and butter in a saucepan to about 40C/100F. Lightly beaten the egg and add warm milk mixture and vanilla extract. Whisk together.
  3. Make a well in the center of flour mixture, pour in the liquid mixture. Stir with a dough hook at slow speed for 1 minute. Increase the speed to the medium and continue to knead until smooth, and the dough leaves from sides of the mixing bowl. Add more flour if necessary.
  4. Turn out the dough and shape into a ball. Lightly grease the mixing bowl and return the dough ball into the bowl, turning to grease all sides. Cover and proof the dough in a warm place for about two hours until it doubles in volume.
  5. Knead the dough a few times on a lightly floured work surface, cover and let rest for 5 minutes. Roll out the dough into a large oval shape and top with the chiffon cake. Roll up like a jelly roll, placing the seam side down into a 33-cm loaf pan.
  6. Butter a piece of plastic wrap and place loosely over the dough. Let rise again until doubled in size, about 1 hour. Preheat oven to 180C/350F and place bread in the center of the oven. Bake for about 40 minutes. Let cool for 10 minutes, then remove from pan and cool on wire rack.


http://schneiderchen.de | © 2011 | http://angiesrecipes.blogspot.com


http://schneiderchen.de | © 2011 | http://angiesrecipes.blogspot.com


I'm submitting this to We Should Cocoa - Bread this month, hosted on Chocolate Log Blog and Chocolate Teapot.


Thursday, November 15, 2012

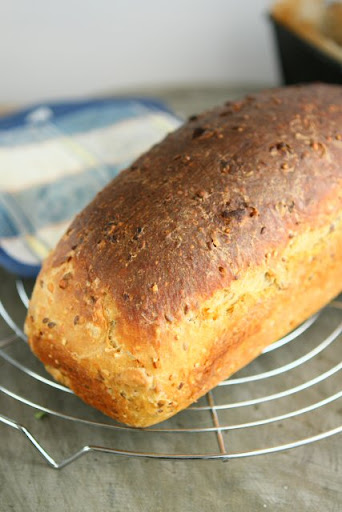
Multiseed Bread with Carrot and Yogurt


http://schneiderchen.de | © 2011 | http://angiesrecipes.blogspot.com


http://schneiderchen.de | © 2011 | http://angiesrecipes.blogspot.com


Another daily bread,adapted from Küchen Götter, contains grated carrots, plain yogurt and seeds such as flax seed, quinoa, buckwheat and amaranth, which are all good for you.


  • 380 g Bread flour
  • 150 g Wholegrain spelt flour
  • 1 tbsp Sugar
  • 1 package / 7 g Instant dried yeast
  • 2 tsp Salt
  • 150 g A mix of quinoa, flaxseed, buckwheat and amaranth
  • 1 Medium sized carrot, peeled and grated
  • 70 g Plain yogurt
  • 250 ml Lukewarm water


  1. Whisk together bread flour, spelt flour, sugar, and salt in a mixing bowl. Make a well in the center. Add in seeds, grated carrot, 50 grams of yogurt and water.
  2. Stir at first on low speed until a rough dough begins to form. Increase the speed and beat until the dough is smooth and elastic.
  3. Turn out the dough and shape into a ball. Return it to the mixing bowl. Cover with a kitchen towel leave it in a warm place for an hour or until it’s doubled in size.
  4. On a lightly floured work surface, roll the dough into a rectangular shape and roll it up. Place it into a parchment paper lined loaf pan. Cover again with the towel and set aside in a warm place for 50 minutes to rise.
  5. Preheat the oven to 200C/400F. When the loaf has risen, brush the surface with the rest of yogurt and bake for 50 to 60 minutes until nicely golden brown.


http://schneiderchen.de | © 2011 | http://angiesrecipes.blogspot.com


http://schneiderchen.de | © 2011 | http://angiesrecipes.blogspot.com