Wednesday, September 7, 2011

Beetroot Salad with Walnut Oil and Chervil & Mangelwurzel Stir-fry


http://schneiderchen.de | © 2011 | http://angiesrecipes.blogspot.com


Here is another very simple and surprisingly tasty cooked beet salad simply dressed with walnut oil and sherry vinegar. Except for cooking the beets, which takes less than an hour to boil in water, the salad is ready in no time at all.


http://schneiderchen.de | © 2011 | http://angiesrecipes.blogspot.com


Mangelwurzel, shortened to mangel, or mangold, aka chard, is one of the cultivated leafy vegetables derived from beet. Like pumpkin, mangelwurzel was traditionally grown as cattle food. However, during the 18th century, European farmers improved mangelwurzels in size and flavour, it has become an excellent addition to our tables. If you love beets, then give this rustic crop a try. You will love them!


Beetroot Salad with Walnut Oil and Chervil


  • 3-4 Medium beetroots
  • 1 tbsp Freshly chopped garden chervil
  • 1/3 tsp Fleur de sel
  • Walnut oil
  • Sherry vinegar

  1. Place beets into a saucepan, and fill with enough water to cover. Bring to a boil, then cook for 30-40 minutes, until tender. Drain and cool.
  2. Once the beets are cool, thinly cut beets acrossways with a mandolin slicer. Finely chop the garden chervil.
  3. Arrange the slices of beets on a serving plate. Sprinkle the chopped parsley and fluer de sel over the beets. Drizzle walnut oil and sherry vinegar over.


Stir-fried Mangelwurzel with Garlic and Black Forest Smoked Bacon


  • 3 slice Black forest smoked bacon
  • 300 g Mangold leaves
  • 2 tbsp Canola oil
  • 2 clove Garlic, thinly sliced
  • 1 Cayenne chilli pepper
  • 1 tbsp Medium dry sherry
  • Salt to taste

  1. Cook bacon until crisp in a skillet over medium-high heat and drain. Crumble the bacon and reserve the dripping.
  2. Wash the mangold leaves well and trim. Cut into the inch pieces. Thinly slice the garlic cloves. Slice the pepper open, remove the membrane and seeds, then slice.
  3. Heat a large skillet over high heat until very hot. Add in the canola oil, bacon dripping and the garlic slices. Stir briefly, then add the mangold and sliced pepper, and stir-fry until the leaves wilt. Drizzle in sherry and taste with salt. Transfer to a serving dish and sprinkle the bacon crumbles over.


http://schneiderchen.de | © 2011 | http://angiesrecipes.blogspot.com


http://schneiderchen.de | © 2011 | http://angiesrecipes.blogspot.com


Sunday, September 4, 2011

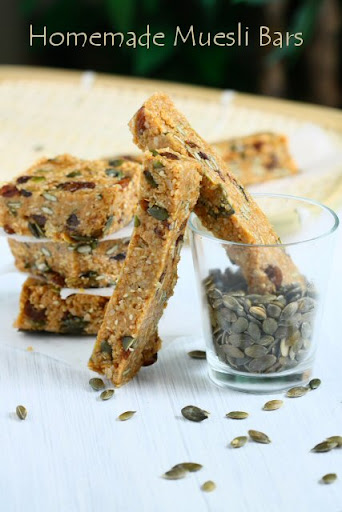
Homemade Muesli Bars


http://schneiderchen.de | © 2011 | http://angiesrecipes.blogspot.com


http://schneiderchen.de | © 2011 | http://angiesrecipes.blogspot.com


Those muesli bars, a mixture of seeds, oats, dried fruit and honey along with some brown sugar, so simple to prepare and perfect for those who enjoy the natural goodness of seeds, cereals and fruit. They are a healthy and high protein snack you can add to the daily lunch box.

Recipe adapted from Taste.


  • 90 g Rolled oats
  • 60 g Desiccated coconut
  • 50 g Wheatgerm
  • 30 g Sesame seeds
  • 50 g Sunflower kernels
  • 50 g Pumpkin seeds
  • 80 g Sultanas
  • 125 g Butter
  • 150 g Honey
  • 50 g Brown sugar

  1. Grease and line a 3cm deep, 16cm x 28cm baking pan with baking paper. Cook oats, coconut, wheatgerm, sesame seeds, sunflower kernels and pumpkin seeds in a frying pan over medium heat, stirring, for 8 to 10 minutes or until golden. Transfer to a bowl. Set aside to cool. Stir in sultanas.
  2. Cook butter, honey and sugar in a small saucepan over medium heat, stirring, for 3 to 4 minutes or until sugar dissolves. Bring to the boil. Reduce heat to low. Simmer, without stirring, for 7 minutes or until mixture forms a soft ball when a little is dropped into ice-cold water. Add to dry ingredients. Stir until combined.
  3. Spoon mixture into pan. Use a large metal spoon to press down firmly. Allow to cool. Cut into squares. Store in a foil-lined airtight container for up to 7 days.


http://schneiderchen.de | © 2011 | http://angiesrecipes.blogspot.com


http://schneiderchen.de | © 2011 | http://angiesrecipes.blogspot.com


Thursday, September 1, 2011

Herb Couscous Salad


http://schneiderchen.de | © 2011 | http://angiesrecipes.blogspot.com


Couscous is a staple food throughout North African countries and a dish enjoyed worldwide. It's a Berber dish that costs little and nourishes a lot. The one we usually find in the grocery stores is the tiny grained Moroccan couscous that has been pre-steamed. All you need to do is to mix them with boiling stock or water, and let stand for a few minutes, fluff the grains with a fork--incredibly easy to prepare. However, couscous is fairly flavorless on its own and tends to take on the flavour of other ingredients or sauces that it’s prepared with. This simple salad, inspired by one of my favourite recipe websites Essen und Trinken, is prepared with fluffy couscous, freshly diced tomatoes, pickled gherkins, and spring onions tossed with a fresh herb vinaigrette.


Dressing

  • 50 g Couscous
  • 100 ml Vegetable stock
  • 100 g Pickled gherkin, diced
  • 100 g Tomato, diced
  • 2 Spring onions, cut into rings
  • Salt

  • 2 tbsp Mint leaves, finely chopped
  • 2 tbsp Parsley leaves, finely chopped
  • 2 tbsp Olive oil
  • 1-2 tbsp Lemon juice
  • Pinch of sugar
  • Salt and black pepper

  1. In a saucepan, bring vegetable broth to a boil. Stir in couscous. Remove from heat. Cover and let stand for 5 minutes. Fluff with a fork. Set aside to cool.
  2. Dice the pickled gherkin and tomatoes. Place them in a bowl. Cut the spring onions into thin rings and add into the bowl.
  3. Finely chop the mint and parsley leaves. Whisk together with the remaining dressing ingredients. Toss together the couscous, diced vegetables and the dressing. Taste, and adjust the seasoning. Cover and refrigerate, allowing the flavours to mingle, for 30 minutes.


http://schneiderchen.de | © 2011 | http://angiesrecipes.blogspot.com


Sunday, August 28, 2011

Streusel Damson Plum Cake / Zwetschgendatschi


http://schneiderchen.de | © 2011 | http://angiesrecipes.blogspot.com


http://schneiderchen.de | © 2011 | http://angiesrecipes.blogspot.com


http://schneiderchen.de | © 2011 | http://angiesrecipes.blogspot.com


Zwetschgenkuchen, a delectable German Plum Cake, also called Sommerkuchen-summer cake, or Zwetschgendatschi is available during the late summer during the damson plum harvest. Datschi, presumably come from a southern German dialect datschen or detschen, means to press in, is a sheet cake (could be prepared in a springform pan too) made with a yeast dough or short pastry, and very often has a streusel topping, which is similar to a crumble. Streusel comes from the German word streusen, to scatter, which is how the topping is applied to the cake.
The recipe is adapted from daheim und unterwegs - wdr.


CakeStreusel

  • 400 g All purpose flour
  • 2 tsp Baking powder
  • 160 g Cold butter, cut into small pieces
  • 90 g Sugar
  • 1/2 tsp Lemon peel, finely grated
  • 2 Small eggs
  • 2 tbsp Milk
  • 1200 g Damson plums

  • 125 g Sugar
  • 150 g Butter
  • 200 g Flour
  • 3/4 tsp Cinnamon powder (optional)


  1. Place all the ingredients for the crust in a bowl, mix them well to form a dough. Chill the dough, wrapped well with a plastic film, for 1 hour.
  2. Meanwhile, wash and dry the damson plums. Cut them open and remove the stones. Grease a 28cm springform pan. Preheat the oven to 200C/400F. Remove the dough from the fridge and press it onto the bottom of prepared pan. Lightly press the damson plums into the crust.
  3. Use a fork or spoon to combine all the topping ingredients until mixture is like coarse cornmeal. Taste and adjust cinnamon to your liking. Sprinkle streusel topping over the damsons.
  4. Bake the cake in the center of hot oven for about 45-55 minutes until done and beautiful golden brown. Cool in the pan on a wire rack 10 minutes. Unmould and serve at room temperature.


http://schneiderchen.de | © 2011 | http://angiesrecipes.blogspot.com


http://schneiderchen.de | © 2011 | http://angiesrecipes.blogspot.com


http://schneiderchen.de | © 2011 | http://angiesrecipes.blogspot.com


Thursday, August 25, 2011

Peanut Butter, Sesame Paste and Raisin Cookies


http://schneiderchen.de | © 2011 | http://angiesrecipes.blogspot.com


http://schneiderchen.de | © 2011 | http://angiesrecipes.blogspot.com


Those peanut butter cookies are crisp and slightly crumbly, and have an fantastic peanut butter taste. Feel free to replace rolled spelt flakes and spelt flour with oats and wheat flour. The recipe has been adapted from Delicious Magazine.


  • 100 g Butter, softened
  • 180 g Crunchy peanut butter
  • 80 g Sesame paste
  • 150 g Light soft brown sugar
  • 1 Large free-range egg
  • A few drops of vanilla extract
  • 125 g Rolled spelt flakes
  • 80 g Raisins
  • 125 g Spelt flour #630
  • 1 tsp Baking soda


  1. Preheat the oven to 160C/320F. Line 2 large baking trays with parchment paper. Beat the softened butter, peanut butter and sesame paste in a bowl with a wooden spoon. Add the sugar and beat again until well mixed.
  2. Add in egg and vanilla to the peanut butter mixture. Beat again with the wooden spoon. Add the rolled spelt flakes and raisins to the mixture, sift over the flour and baking soda and mix well.
  3. Put large spoonfuls of the mixture onto the trays, spacing slightly apart, and bake for 20 minutes until light golden. Remove from the oven. Leave to firm up on their trays for a few minutes, then transfer to wire racks to cool completely. Store in an airtight container in a cool place for up to 3 days.


http://schneiderchen.de | © 2011 | http://angiesrecipes.blogspot.com


http://schneiderchen.de | © 2011 | http://angiesrecipes.blogspot.com


Sunday, August 21, 2011

Strawberry Yogurt Cake


http://schneiderchen.de | © 2011 | http://angiesrecipes.blogspot.com


http://schneiderchen.de | © 2011 | http://angiesrecipes.blogspot.com


A fresh and delectable summer cake layered with Joconde sponge and yogurt mixture that has been lightened up with whipped cream and elegantly finished with fresh strawberries and pistachios as topping. It’s perfect for people who enjoy creamy and light desserts.

Adapted from Das Neue Blatt magazine (No.29 13.July 2011)


  • 2 slice Square Joconde sponge cake (9-10 inch)
  • 10 sheet Leaf gelatine
  • 150 g Strawberry jam
  • 1000 g 3.5% Wholemilk yogurt
  • 1 package / 8 g Vanilla sugar
  • 100 g Sugar
  • 250 g Whipping cream
  • 350 g Fresh strawberries
  • 2-3 tbsp Pistachios, finely chopped

  1. Soak the gelatine in a small bowl of cold water until softened. Spread half of the strawberry jam on one piece of sponge cake and place it onto the bottom of a 9-inch square springform pan.
  2. Beat together the yogurt, vanilla sugar and sugar in a bowl until well-blended. Gently squeeze the softened gelatine to remove the excess water and place the gelatine in a saucepan.
    Over a very gentle heat, allow the gelatine to melt slowly, stirring once or twice. Once it has melted, stir about 3 tablespoons of yogurt cream into the melted gelatin, then pour it back to the rest of yogurt mixture. Stir until smooth and blended.
  3. Whip the cream until firm and fold into the yogurt mixture. Pour 2/3 yogurt mixture onto the sponge. Top with second sponge cake, then spread with the rest of strawberry jam.
  4. Attach a pastry bag with a star tip and fill in the rest of yogurt cream. Pipe the cream on the top of cake. Chill the cake for at least 2 hours until set. Decorate with chopped pistachios and fresh strawberries. Slice and serve.


http://schneiderchen.de | © 2011 | http://angiesrecipes.blogspot.com


http://schneiderchen.de | © 2011 | http://angiesrecipes.blogspot.com


Wednesday, August 17, 2011

Brown Rice Salad with Beet and Herbs & Roasted Beet Chips


http://schneiderchen.de | © 2011 | http://angiesrecipes.blogspot.com


It’s a shame that many people (my husband included) are averse to this appealingly rich purple bulb, that has been considered beneficial to the digestive system, as a cancer preventative, and a tonic of blood. It is a nutritious vegetable with many health-giving and healing properties.
Aside from bringing immeasurable good to human health, the sweet, earthy and velvety beet makes attractive, colourful and delicious dishes.


Sweet, spicy and satisfyingly crunchy...could those chips convince your husband to eat beets who passionately dislikes them?


http://schneiderchen.de | © 2011 | http://angiesrecipes.blogspot.com


Brown Rice Salad with Beetroot and Herbs


SaladDressing

  • 250 g Brown rice
  • 350 g Roasted beetroot, chopped into chunks
  • 2 tbsp Spring onions, finely sliced
  • 1 tbsp Fresh tarragon, finely chopped
  • 2-3 tbsp Fresh dill, roughly chopped

  • 3 tbsp Freshly squeezed orange juice
  • 1-2 tbsp White balsamic vinegar
  • 2 tbsp Extra virgin olive oil
  • Salt and freshly ground black pepper

  1. Cook the brown rice according to the packet instructions. It takes about minutes. Drain and rinse under cold running water. Drain really well and tip into a large bowl.
  2. Stir the spring onions, chopped tarragon, dill and beetroot though the rice. Mix together the dressing ingredients and taste to check the seasoning. Stir the dressing through the salad. Pile the rice salad on a large serving dish and garnish with some roughly chopped dill. Serve immediately.


Oven Roasted Beetroot Chips


  • 3 Medium beetroots, peeled and thinly sliced
  • 1 tbsp Olive oil
  • Pinch of chilli powder
  • Sea salt to taste

  1. Preheat the oven to 170C/340F. Line a baking sheet with parchment paper. Clean, dry and peel the beetroots. Using a mandolin or a sharp knife, slice them into wafer-thin crisps.
  2. Toss in a bowl with olive oil, chilli powder and salt. Arrange on the baking sheet in a single layer. Roast 45 minutes to 1 hour, turning halfway through, until crisp. Check often to make sure they don't burn. Spread out on paper towel until cool and crisp. Sprinkle with additional chilli powder and salt if necessary.


http://schneiderchen.de | © 2011 | http://angiesrecipes.blogspot.com


http://schneiderchen.de | © 2011 | http://angiesrecipes.blogspot.com